月度归档:2022年03月

赚钱宝设备,刷机后,故障记录,Debian 10系统,iptables v1.8.2 (nf_tables): TABLE_ADD failed (Invalid argument): table filter 2022-3-5

问题描述

上次刷机的迅雷赚钱包ARM机器,armbian里面没有iptables,其基于Debian 10的,那安装即可,但是,安装后出现报错

查看系统版本

lsb_release -a
Distributor ID: Debian
Description: Debian GNU/Linux 10 (buster)
Release: 10
Codename: buster
uname -a
Linux ARMXLII 3.10.36 #52 SMP PREEMPT Mon Mar 15 14:14:47 CST 2021 armv7l GNU/Linux

安装过程

apt-get update
apt-get install iptables iptables-persistent

查看防火墙的状态

iptables -L -v

执行上面查看防火墙状态的命令,出现的报错提示

iptables v1.8.2 (nf_tables):  TABLE_ADD failed (Invalid argument): table filter

报错的原因,其实就是预设的nf_tables,没有加载到对应的模块,把iptables-legacy启用即可,感谢留言解决此问题。

执行命令

update-alternatives --set iptables /usr/sbin/iptables-legacy
update-alternatives --set ip6tables /usr/sbin/ip6tables-legacy

常用Debian/Ubuntu/CentOS服务器增加IPv6地址的方法 2022-3-3

本篇章博客介绍,如何给你的服务器,增加IPv6地址

网络配置,有一定的风险,请勿直接在生产环境进行,请先用虚拟机测试OK,再进行生产实践。

网络配置,有一定的风险,请勿直接在生产环境进行,请先用虚拟机测试OK,再进行生产实践。

网络配置,有一定的风险,请勿直接在生产环境进行,请先用虚拟机测试OK,再进行生产实践。

假设你公网网卡名称为 eth0,本文以此名称示例,请修改到你自己的网卡名称

假设你的公网IPv6地址为 address 20a1:0db1:0021:0008:0000:0000:6115:eb3f

假设你的公网IPv6网关为 gateway 20a1:0db1:0021:0008:0000:0000:0000:0001

假设你的公网IPv6掩码为 netmask 64

段落1、如果系统为Debian / Ubuntu 16.04

修改 
/etc/network/interfaces.d/90-ipv6

iface eth0 inet6 static
    accept_ra 0
    address 20a1:0db1:0021:0008:0000:0000:6115:eb3f
    netmask 64
    mtu 1500
    gateway 20a1:0db1:0021:0008:0000:0000:0000:0001

重启网络服务
systemctl restart networking

段落2、如果系统为Ubuntu 18.04 / 20.04

修改
/etc/netplan/90-ipv6.yaml

network:
    ethernets:
        eth0:
            addresses:
            - 20a1:0db1:0021:0008:0000:0000:6115:eb3f/64
            gateway6: 20a1:0db1:0021:0008:0000:0000:0000:0001
    version: 2

应用到网络
netplan apply

段落3、如果系统为CentOS / AlmaLinux

修改
/etc/sysconfig/network-scripts/ifcfg-eth0

增加
IPV6ADDR=20a1:0db1:0021:0008:0000:0000:6115:eb3f/64
IPV6INIT=yes
IPV6_DEFAULTGW=20a1:0db1:0021:0008:0000:0000:0000:0001%eth0

重启网络服务
systemctl restart network

上面任意系统修改后,记得查看一下网络状况

ip -6 addr 

附录、如果商家给你的是一个/64透传的地址,则可能优先按照商家的教程配置,网络复杂,根据实际的配置

比如下面的配置,增加在 /etc/network/interfaces

iface ens3 inet6 static
        address 2a06:af81:1:8682::1/64
        gateway fe80::1

服务器/etc/network/interfaces的IPv6配置,典型模板 2022-03-03

网络配置文件 /etc/network/interfaces的典型IPv6配置

# The primary network interface
auto eth0
iface eth0 inet static
address 15.12.178.81
netmask 255.255.255.0
gateway 15.12.178.1

iface eth0 inet6 static
	accept_ra 0
	address 2a04:ac0d:101:84e::
	netmask 64
	gateway 2a04:ac0d:0101:0000:0000:0000:0000:0001
post-up /sbin/ip -r route add 2a04:ac0d:0101:0000:0000:0000:0000:0001 dev eth0
post-up /sbin/ip -r route add default via 2a04:ac0d:0101:0000:0000:0000:0000:0001
# OVZ Debian 9
iface venet0 inet6 static
	address ::2
	netmask 128
	up ip -6 r a default dev venet0
	up ip addr add 210b:5100:60:370f:d3::5cb4/80 dev venet0

参数示意

1、 eth0为网卡 名称

2、 static静态地址

3、address为IP地址

4、netmask掩码

5、gateway网关

6、ip命令增加路由

基于双栈服务器的原生IPv6地址,用V2ray解锁当地Netflix HBO等流媒体 2022-03-01

段落1、需求

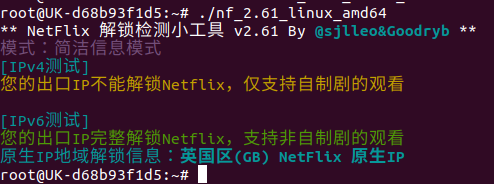
服务器的IPv4看Netflix,没希望,被Netflix的IP地址库封的死死的,手里有一台服务器,它的IPv6地址是英国的原生IPv6,可以支持观看Netflix

那么,就简单了,我们通过配置让Netflix的流量走到IPv6出口即可

入站的流量通过服务器的IPv4地址进入,出站的Netflix流量通过原生IPv6出站,其余非Netflix流媒体的流量,还是通过IPv4出站

通过 基于sjlleo/netflix-verify,检测VPS服务器IP地址或节点IP是否支持Netflix流媒体 2022-2-28

段落2、部署操作

操作1-3

// 在routing的rules列表中增加Netflix的相关域名,指定它走IPv6的路由

  "routing": {
    "domainStrategy": "IPIfNonMatch",
    "rules": [
      {
        "type": "field",
        "domain": [
          "netflix.com",
          "netflix.net",
          "netflixdnstest1.com",
          "netflixdnstest2.com",
          "netflixdnstest3.com",
          "netflixdnstest4.com",
          "netflixdnstest5.com",
          "netflixdnstest6.com",
          "netflixdnstest7.com",
          "netflixdnstest8.com",
          "netflixdnstest9.com",
          "netflixdnstest10.com",
          "netflixinvestor.com",
          "netflixtechblog.com",
          "nflxext.com",
          "nflximg.com",
          "nflximg.net",
          "nflxsearch.net",
          "nflxso.net",
          "nflxvideo.net",
          "geosite:netflix"
        ],
        "outboundTag": "IPv6_OUT"
      },
      {
        "type": "field",
        "outboundTag": "IPv4_OUT",
        "network": "udp,tcp"
      }
    ]
  },

操作2-3

// 在入站的inbounds中增加"sniffing"的参数

  "inbounds": [
    {
      "sniffing": {
        "enabled": true,
        "destOverride": [
          "http",
          "tls"
        ]
      },
      "settings": {
        "clients": [
          {
            "id": "dc0d52a2-c6c3-44e4-85cf-b479f736c378",
            "alterId": 0
          }
        ]
      },
      "port": 8080,
      "protocol": "vmess"
    }
  ],

操作3-3

// 在outbounds出站中区分开IPv4/IPv6两项内容

  "outbounds": [
    {
      "protocol": "freedom",
      "settings": {},
      "tag": "IPv4_OUT"
    },
    {
      "protocol": "freedom",
      "settings": {
        "domainStrategy": "UseIPv6"
      },
      "tag": "IPv6_OUT"
    },
    {
      "settings": {},
      "protocol": "blackhole",
      "tag": "blocked"
    }
  ]

段落9、额外信息

同理,一些主流的支持IPv6的网站,也可以根据这个办法,进行IPv6分流

"geosite:netflix"
"geosite:google"
"geosite:youtube"

还有一种方式备用,sni+dnsmasq 分流

搭建完后,修改配置/etc/sniproxy.conf,设置ipv6优先,完重启机器

resolver {
    nameserver 8.8.8.8
    nameserver 8.8.4.4 # local dns should be better
    mode ipv6_first
}

系统环境Ubuntu 20.04或者Debian 10,安装MySQL 8数据库 2022-03-01

段落1、需求

在Ubuntu 20.04 LTS环境上,编译安装MySQL数据库

段落2、部署实施

更新包索引

apt-get update

安装MySQL Server

apt install mysql-server

安装的一些包信息如下

The following NEW packages will be installed:
  libcgi-fast-perl libcgi-pm-perl libencode-locale-perl libevent-core-2.1-7
  libevent-pthreads-2.1-7 libfcgi-perl libhtml-parser-perl libhtml-tagset-perl
  libhtml-template-perl libhttp-date-perl libhttp-message-perl libio-html-perl
  liblwp-mediatypes-perl libmecab2 libtimedate-perl liburi-perl mecab-ipadic
  mecab-ipadic-utf8 mecab-utils mysql-client-8.0 mysql-client-core-8.0
  mysql-common mysql-server mysql-server-8.0 mysql-server-core-8.0
0 upgraded, 25 newly installed, 0 to remove and 0 not upgraded.
Need to get 31.4 MB of archives.
After this operation, 262 MB of additional disk space will be used.
Do you want to continue? [Y/n] Y

段落3、MySQL的安全加固

mysql_secure_installation
Press y|Y for Yes, any other key for No: y


LOW    Length >= 8
MEDIUM Length >= 8, numeric, mixed case, and special characters
STRONG Length >= 8, numeric, mixed case, special characters and dictionary                  file

Please enter 0 = LOW, 1 = MEDIUM and 2 = STRONG: 2

// 数据MySQL数据库root用户的密码,密码可自定义,假设密码为,CbA5_eaC8_b0d4_Ff0a_2b76,输入密码时候,密码不显示,直接输入按回车
New password: CbA5_eaC8_b0d4_Ff0a_2b76
Re-enter new password: CbA5_eaC8_b0d4_Ff0a_2b76


Estimated strength of the password: 100 
Do you wish to continue with the password provided?(Press y|Y for Yes, any other key for No) : Y

// 移除匿名用户
Remove anonymous users? (Press y|Y for Yes, any other key for No) : Y

// 禁止root远程登录
Disallow root login remotely? (Press y|Y for Yes, any other key for No) : N

// 移除测试库实例
Remove test database and access to it? (Press y|Y for Yes, any other key for No) : Y

// 重载一下权限
Reload privilege tables now? (Press y|Y for Yes, any other key for No) : Y

段落4、创建数据库的普通帐号

root@UK-d68b93f1d5:~# mysql -u root -p
Enter password: 
Welcome to the MySQL monitor.  Commands end with ; or \g.
Your MySQL connection id is 10
Server version: 8.0.28-0ubuntu0.20.04.3 (Ubuntu)

Copyright (c) 2000, 2022, Oracle and/or its affiliates.

Oracle is a registered trademark of Oracle Corporation and/or its
affiliates. Other names may be trademarks of their respective
owners.

Type 'help;' or '\h' for help. Type '\c' to clear the current input statement.

mysql> 
// 数据库的版本信息
Server version: 8.0.28-0ubuntu0.20.04.3 (Ubuntu)

// 进入数据库,需要输入刚刚的密码
root@server:~# mysql -u root -p

// 创建数据库的普通用户 wordpress,看你本地版本,选择创建普通用户的命令,二选一执行
// MySQL 8.0, caching_sha2_password is the default authentication plugin
// MySQL 5.7, mysql_native_password is the default
mysql> CREATE USER 'wordpress'@'localhost' IDENTIFIED WITH caching_sha2_password BY 'wordpress_57AADFEF668Ae2E8E6285858';
mysql> CREATE USER 'wordpress'@'localhost' IDENTIFIED WITH mysql_native_password BY 'wordpress_57AADFEF668Ae2E8E6285858';

// 如果是删除普通用户 wordpress
mysql> DROP USER 'wordpress'@'localhost';

// 如果是删除普通的数据库实例 wordpress
mysql> drop database wordpress;

// 查看数据库中的用户
mysql> select User from mysql.user;

// 查看数据库中的数据库实例
mysql> show databases;

// 创建一个数据库实例 wordpress
// MySQL 8.0比较推荐使用 utf8mb4
// MySQL 5.5比较推荐使用 utf8
// MySQL supports two kinds of UTF8 character sets: utf8 and utf8mb4
// MySQL's utf8mb4 character table is a superset of BMP and contains also 4-bytes characters. This character tables is supported since MySQL 5.5.3
// MySQL version 5.5.3 or later, use the utf8mb4 character set
mysql> create database wordpress character set utf8mb4 collate utf8mb4_bin;
mysql> create database wordpress character set utf8 collate utf8_bin;

// 把普通数据库账号和数据库实例关联起来
mysql> GRANT ALL privileges ON wordpress.* to wordpress@localhost;

// 也可以只把某个表的权限给到数据库用户
mysql> GRANT PRIVILEGE ON wordpress.tablename TO 'wordpress'@'host';

// 如果是单项权限的修改,可参考命令
mysql> GRANT CREATE, ALTER, DROP, INSERT, UPDATE, DELETE, SELECT, REFERENCES, RELOAD on wordpress.* TO 'wordpress'@'localhost' WITH GRANT OPTION;

// 权限生效
mysql> flush privileges;

// 推出交互
mysql> exit

// 查看MySQL服务状态 
systemctl status mysql.service
systemctl restart mysql.service

系统环境Ubuntu 20.04或者Debian 10,安装php 7.4版本 2022-03-01

需求

为了衔接Nginx和MySQL数据库,我们需要安装php

Nginx没有内在支持php,故而,我们需要PHP-FPM (“fastCGI process manager”)来驱动它

部署实施

更新包清单

apt update

安装

apt install php-fpm
// Ubuntu 20.04.4 LTS 安装的日志记录 2022-3-1
The following additional packages will be installed:
  php-common php7.4-cli php7.4-common php7.4-fpm php7.4-json php7.4-opcache
  php7.4-readline
Suggested packages:
  php-pear
The following NEW packages will be installed:
  php-common php-fpm php7.4-cli php7.4-common php7.4-fpm php7.4-json
  php7.4-opcache php7.4-readline
0 upgraded, 8 newly installed, 0 to remove and 0 not upgraded.
Need to get 4,080 kB of archives.
After this operation, 18.1 MB of additional disk space will be used.
Do you want to continue? [Y/n] Y
...
Setting up php-fpm (2:7.4+75) ...
Processing triggers for man-db (2.9.1-1) ...
Processing triggers for systemd (245.4-4ubuntu3.15) ...
Processing triggers for php7.4-cli (7.4.3-4ubuntu2.9) ...
Processing triggers for php7.4-fpm (7.4.3-4ubuntu2.9) ...

查看服务的状态

systemctl status php7.4-fpm

增加修改对于Nginx的衔接

server {

    # . . . other code

    location ~ \.php$ {
        include snippets/fastcgi-php.conf;
        fastcgi_pass unix:/run/php/php7.4-fpm.sock;
    }
}

重启服务

systemctl restart nginx

安装扩展模块,比如MySQL支持的模块

apt install php-mysql 

安装扩展模块,比如图片的模块

GD is an open source code library for the dynamic creation of images. GD is used for creating PNG, JPEG and GIF images and is commonly used to generate charts, graphics, thumbnails on the fly.

apt install php-gd

创建一个临时的PHP INFO测试文件,测试通的之后,记得删除

一般的路径为 /var/www/html/info.php

<?  phpinfo(); ?>

备注1, 一般推荐安装这个php 7.4的版本,不推荐安装旧的版本了。